Sunday, January 29, 2012

Organization Fail.

When I started this blog, or started thinking about this blog, I knew I wanted to try a tons of things and share my experiences. I envisioned these amazing recipes, style tips and DIY projects and they were all going to be FABULOUS! And you were all going to applaud me and be in awe of my mad skills being put to the test!

Yes, I have high hopes :)

Well, so far here on "Don't worry. Be happy. Keep learning." I have:

• Created a tasty new Chicken Strip recipe
• Made use of a wine cork while getting out every last drop of conditioner
• Created a wreath out of coffee filters
• Swirled together Heaven in a blender with frozen bananas, cocoa and strawberries
• Got a new hairdo all in the name of new beginnings and charity (*Update, I decided to send my hair to Locks of Love after some online research and advice from friends)
• Combined chicken, veggies and noodles for a simple Chicken Lo Mein recipe
• Began a love-hate relationship with Jillian Michaels
• Transformed the sleeve of my sweater into a fun bracelet

I'd say these were all successes... sans the applause from the crowd. In the beginning, I didn't exactly envision trying something and failing. Well, I have finally failed.

I recently attempted an organizational solutions that I found on Pinterest. I say ATTEMPTED for a reason. The original Pinterest post looks lovely. It says to install a tension rod under your sink, and hang your spray bottles on it. I imagine this is to get the bottles off the bottom of the cabinet and offer a pleasing image of an organized cleaning supply. Sounded simple enough, right?

Here is my inspiration from Pinterest:


Here is how my attempt went:


1) Purchased a 7/16" tension rod that was 28"- 48" long at Walmart for about $3 and place it under the cabinet.


2) Hung first bottle on tension rod, then second, then third, then fourth.


3) Hung fifth bottle...

4) Watched everything fall.


5) Felt sad. 

I tried this over and over before I came to the conclusion that this wasn't going to work out for a few reasons. The size of rod I bought is too small to support the weight of the bottles which were each only about half full. Our cabinet is just short of 3 ft. wide and the center of the rod was swaying and making a snapping noise each time. 

In order to make this work, I'd suggest using a thicker [than 7/16"] tension rod. However, if you get one that is too big (like a shower curtain rod), my guess is that your trigger to bottle distance might be too small to fit over the rod. So, something right in the middle maybe. Through trial and error, I'm sure this could work. It just didn't for me this time. 

I did end up straightening the bottles so I could feel a little satisfied walking away from this one. Until I get back to the store for another attempt, this is how our cabinet looks. 


What kind of things have you tried that didn't work out like you hoped?

* Update to this blog * 
Any reader can now leave a comment (even if you do not have primary blog account). Simply click on "Anonymous" in the "Comment as" drop down menu. I do ask that you sign your name at the bottom of your comment so I know that you stopped by. 

Thanks and Happy Organizing!

Saturday, January 21, 2012

Accessorize with a sweater.

When I think of a sweater I don't think of it as an accessory. More of a main dish... or main attraction... or Oh gosh, I don't know. I just know it's not an accessory.

News Alert: I've never claimed to have much knowledge on the subject of "fashion" so who am I to say?

Let me ask you this.... What happens when you have a pretty green sweater that you bought for $2.50 at Goodwill on Half Off Saturday (oooh yea!), you wore it once or twice, the next time you washed it, you forgot to "lay flat to dry" and instead put it in the dryer, and now it looks like the same sweater except it hits you at your natural waste [that's ABOVE the belly button, mind you] rather than at your hip where it should be? 

Oh, well, you cut it up and make things out of it, that's what!

This morning I was surfing through Pinterest (once again) and found these treasures...


These are oddly comforting and pretty, too, but the link to what I thought would be a tutorial was just a page asking me to sign in. So I was bummed. But then I thought to myself "Self, you're smart. Figure this out." 

I remembered my shrunken green sweater still hanging in my closet... yea, it's been a month since I shrunk it but I still have it in there. I grabbed the shrunken green sweater, and a blue wooden bracelet I never wear (I just had to be honest with myself), and I grabbed my sewing supplies and scissors and went to work. 

I started with the following:
• my shrunken green sweater
• wooden bracelet
• thread
• needle
• pins
• scissors


Here's how to do what I did...

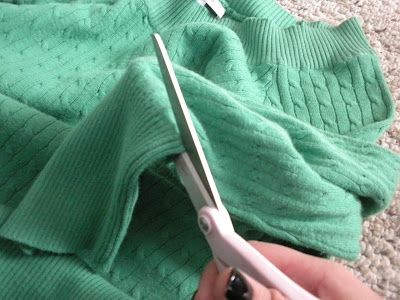
1. Cut the cuff of the sweater off. You won't need that part, you just need the cable knit part.


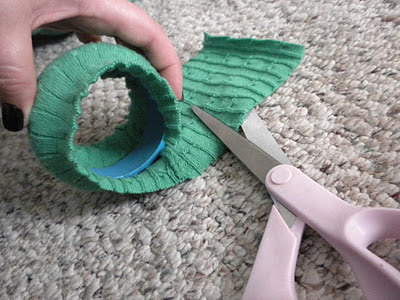
2. Determine how much of the sweater you will need by wrapping the sleeve around the bracelet and cutting the sleeve in that place. You will end up with a tube-shaped piece.


3. Cut the sweater (hereinafter referred to as "fabric") near the already existing seem, so you have one long strip of fabric.


4. Roll your bracelet down the middle of the fabric to determine how much of it you will need in order to wrap it completely. Since my sweater has quite a bit of stretch in it, I had to cut a couple inches off the end. 


5. Join the ends of the fabric together and make a simple stitch. Be sure that the "outside" of the sweater is inside when doing this so when you flip it right side out, the seem you're stitching will be on the inside.
6. Wrap the fabric around the bracelet and using the pins, secure the fabric every inch or so. 


7. Sew the fabric around the bracelet. Don't worry if the stitch isn't pretty. You won't see it at the end.


8. Rotate the seem to the inside of the bracelet and you're done!


What do you think?


VARIATIONS:
• Instead of the wooden bracelet, you could probably use any ring that fits around your fist and fits as a bracelet... like the plastic ring you get when you buy a scarf, or cheap bangles from the Dollar Tree (gosh, I love that place)
• Use a sewing machine instead of needle and thread for connecting the fabric in step 5


WAIT! THERE'S MORE....

I got SEW drunk from cutting up my sweater that I decided to make a braided bracelet with it like I've also seen on Pinterest. I've done this before a few months ago using an old t-shirt and this is how that one turned out:

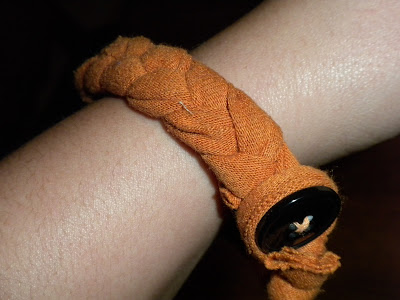
For the braided sweater bracelet, start by cutting a little more from the sleeve, then cut that part into three strips, and knot the end. For this one, it really wouldn't matter which part of the sweater you use, you just need about 3 strips about 1 inch wide by 10 inches long.


I used an oh-so-fancy way of securing the start of my braid for tension while braiding... (please ignore my ugly feet)


Secure the end again by making a knot.


Bring the ends together and stitch them in two places.


Double wrap it around your wrist, and it's that easy!


WAIT! There's more more! I even made a ring out of a little scrap. Just tied it around my finger and knotted it twice. It's cute, right?


What could YOU create with some old t-shirts, sweaters, sweatpants, socks, denim leggings.....?


Happy Sewing!

Wednesday, January 18, 2012

Get in shape.

In the spirit of trying new things and learning new workouts and ways to get fit without clocking over 30 minutes on treadmill, I've embarked on a workout video adventure. What have I learned?

I've learned that I hate Jillian Michaels.

Okay, HATE is a strong word. 

I really really reeeally dislike Jillian Michaels.

And I wish she would shut up.

HA! (It's nothing personal. I just don't deal well with people telling me what to do when I'm in a stressful situation. And basically, that's what all workout videos are about.)

I've also learned that I'm stronger than I thought.

And I've learned that there is a "sweet spot" in our living room a.k.a. the floor joist where I can do jumping jacks and jump rope and not shake the whole living room (in our over 100 year old home). If I try jumping at all and I'm not on the joist, the picture frames start to shutter in mere fear of Ms. Michaels, or so I like to think.

Regardless of my feelings toward this woman that I really don't personally know, she is whipping my booty into shape. I'm currently doing the 30 Day Shred that I purchased over a year ago, that has been sitting on my DVD shelf collecting dust. So far, I've done Level 1 a handful of times and can already tell I'm getting stronger. The exercises are not as hard each time and I am panting less like a sick dog and more like a normal woman just getting her heart rate up!

Mike finds it entertaining. And my cat, she just plops down on the carpet in front of me and taunts me. 

Tomorrow I'm thinking about bumping up to Level 2. 

We'll see.

Last night, I had Mike take "before" pictures of me (these may or may not be seen by anyone else on the planet besides us two). Never a fun moment to look at a photo of yourself in a sports bra and athletic pants, but what better motivation, right?

I'm thinking of getting prints of these pics made and putting them in the fridge. Or in the cupboard. Or carrying one in my purse. For right now, they'll stay on my camera. But I'm serious about this "get in shape" thing and I'm excited to get stronger and feel better.

What are you guys doing to get OR STAY in shape?

Happy Exercising!

Sunday, January 15, 2012

Chicken Lo Mein.

I love stir fry. I love Chinese food.

My favorite restaurant BY FAR is Flat Top Grill. YUM. YUM. YUM.

Slight problem... lo mein and stir fry in a restaurant is expensive. In our house, we have developed our own stir fry recipe. I will tell you that Mike and I have been making stir fry for a couple years now, so technically this isn't something "new" to us (see my first post about trying new things) but the NEW thing here are the noodles. We usually use Birds Eye Asian Medley that has just veggies, no lo mein noodles. However, while at Kroger's I found the Kroger brand stir-fry with noodles. I thought that sounded delightful! So basically, without the noodles, it's just chicken stir-fry. With the lo mein noodles it's chicken lo mein. Either way [spoiler alert] it's delicious!

Chicken Lo Mein (or stir fry)

What you'll need:
• 2-3 chicken breasts (thawed)
• 3/4 to 1 cup of teriyaki sauce
• frozen veggy mix, lo mein noodles optional (I recommend something with pea pods, water chesnuts, carrots, mushrooms and/or brocolli)


1. Start by slicing your chicken into small bite-sized pieces. Put some oil in a skillet (or a wok), turn heat to Medium High to heat pan. Add chicken.

2. Once the chicken is cooked thoroughly, add the teriyaki sauce. Add enough sauce to coat the chicken and then some more since you'll be adding in some veggies that will need to soak up that flavor, too. Let the sauce fuse into the chicken (about 5 minutes).


3. Add the veggies.


4. Let cook on High for a few minutes until everything is heated through.


5. EAT IT! ENJOY IT!


I absolutely loved this. It tastes almost like chicken lo mein from my favorite Chinese restaurant. Mike's opinion was "It's better than I thought it would be. I wasn't a big fan of the peppers, but overall it tasted pretty good."


We will for sure be making this again, but next time we might try a different veggy mix without the peppers, so that the husband is happy.

Some variations that I can think of:
• Use fresh cut vegetables instead of frozen - we do frozen since this is a time-saving recipe
• Marinate the chicken prior to slicing and cooking
• Cook your own spaghetti noodles and add to the mix when you add the veggies

If you have some suggestions, I'd love to hear them. 

Happy cooking!

Saturday, January 14, 2012

The Big Cut.

Talk about trying something new!! What's more courageous and not boring than a new haircut? Like a major haircut? Well, right now, to be honest, I can't think of anything.

Because I'm still in shock.

Good shock. 

I finally did it. I finally fullfilled my [10 year in the waiting] goal of one day donating my hair to charity. I felt like now was no better time than any other. I just got married, I have this big outlook on 2012 and quite frankly, I just needed a change. My long strands were getting to be too much of a hassle. And were not pretty anymore.

My awesome friend Shannon came along with me today to document this huge life event [can you tell yet how extreme this was for me?] Our equally awesome friend, Shaundel, did the honors of cutting and styling. I came armed with photos that I had collected on my Pinterest board The Big Cut. She did her magic, and well, I couldn't be any more giddy about my new look! 

Here's how long it was before:

And here is my new do!!!

So, what do you think? 

I am donating my [extremely thin] locks to Children With Hairloss, an organization that provides wigs to all children with medical related hairloss. Their goal is to empower these children to become whole again by making hair available to those who may be financially challenged and might otherwise not have a means of obtaining the hair they want and need. Anyone who knows me, knows I have a special place in my heart for children. And this organization seemed like a great place to send the hair that I don't need and could put a smile on a kid's face. 

And last, but not least, I feel it is more than appropriate to apply the Mike Meter here. I mean, really, his opinion means everything! 


An 8! Not bad! When he got home and finally saw me he said, "It's better than I thought it would be" and "It's not terrible" which at the time, were compliments. He didn't HATE it and that's great! I know he'll just need to get used to it, as will I!


Important note: I should say if you're reading this, Shaundel, these statements in NO WAY reflect Mike's or my expectations of your mad crazy hair styling skills. We both love you. I'm sure you know that. :)


Mike and I are headed to dinner. He's taking me on a date to celebrate the new "me." 


Happy Cutting!!!

Thursday, January 12, 2012

Banana Split Smoothie.

While perusing Pinterest (as I often find myself doing) I found this quick recipe for Chocolate Banana Smoothies. It just so happened that I had all the ingredients needed for it, as well as some fresh strawberries. So I call this my Banana Split Smoothie. It's really very simple, as you will see.

Banana Split Smoothie

What you need:
• One frozen banana
• 1 tbsp. cocoa powder
• 4 strawberries (optional)

1. Put all ingredients into the blender.

2. Blend until banana is broken up.


3. Drink!

See? I told you it was easy. 

There isn't a Mike Meter for this one because I drank it all before he had a chance to taste it. Plus, he's sick so he wouldn't be able to accurately judge it, anyway.

Some tips:
• Be sure to peel the banana PRIOR to freezing. Trust me, it's really hard to remove a banana peel from a frozen banana. [hmph!] Seriously, trust me :)
• For a creamier consistency, add a little bit of milk.

Happy Smoothi-ing!

Wednesday, January 11, 2012

Make a Wreath.

This post is a little outdated. I realize Christmas decorating is, like, so last year, but I didn't have this blog then. Cha! I think I can still share my craftiness with you now!

There are so many options when it comes to making wreaths. I mean, really you can attach anything to a foam ring, hang it on your door and call it a wreath!

Well, I made a wreath! Yea! And I like it!

What you need:
• 12" foam ring - found at Michael's, JoAnn Fabrics, not Walmart (really, I've asked)
• Brown "natural" coffee filters
• hot glue gun
• Your choice of accessories

I don't have a step by step tutorial for this one, and I sincerely apologize. Reason being, I made it about a year ago, and failed to document it properly while making it. I did find this thorough tutorial on how to make one with white filters, if you're into that. 

Here is my finished product. I added our wedding cake topper "D" and some berries from my wedding bouquet.

Now that Christmas is over, I have removed the ornament. It's still hanging on our living room wall, but I'm considering hanging it on our door with some snowflakes or snowment accessories. What do you think? Are wreaths only appropriate at Christmastime?

Variations:
• Make your own wreath using pipe insulation (Go here)
• Use push pins instead of gluing the filters to the foam - keep in mind this is a less permanent method and you risk having the filters fall out if bumped or blown away.
• Use fabric, or newspaper, or really any paper pieces in place of filters.

Happy Crafting!

Tuesday, January 10, 2012

Put A Cork In It.

After jumping onto the Pinterest bandwagon just over a month ago, I have been wandering my house brainstorming on how I can better organize and utilize our things, like the miracle workers I see on the site. I see so many neat ideas and think to myself "Now, why didn't I think of that?"

Well, friends, I thought of something. And I'm pretty proud of myself. No joke, when it came to mind my first thought was "I've got to share this with someone!"

Introducing...

THE CORK.


Okay, yes, to some people, it's just a cork. But when you remove the pump from your conditioner (or shampoo) bottle, replace it with this handy little thing and turn the bottle upside down in the shower, this is what you get.


Not only does your conditioner all race to the bottom allowing you to get every last drop of it out, but also the cork is non-slip, so your bottle doesn't randomly slide off your shower shelf and scare the bajeezas out of you when it goes crashing to the tub floor!

Maybe this isn't a big deal to some of you. But I felt like a GENIUS when I thought this little diddy up.

And, yes, I got the last drop of conditioner out of that ginormous bottle, then tossed it in the recycling bin.